 and enter relevant details as shown
below.
and enter relevant details as shown
below..
This tutorial explains how to insert pictures to your test, for aesthetic purposes, as items or otherwise.
It is assumed that you are familiar with the Concerto v3.0 Tutorials: Create a simple test section and are familiar with the basic functions of Concerto v3.0 (Concerto v3.0 Tutorials: General Manual).
Note:
.
An essential part of setting up web pages is its publication. This includes uploading related files (pictures etc.) to the host server where the web page is likely to be located. More specifically, an FTP program is used for this purpose. In the case of a test, images and clips need to be uploaded to a publicly (www) accessible directory. Thus, the first step is to get an FTP account with a public access directory and upload the relevant files.
.
The best way to insert images is to do so directly using the toolbar in the templates tab. Click the image
icon and enter relevant details as shown
below.
URL: www location of your uploaded files
Alternative Text: Brief description of image
Width, Height, Border, HSpace, VSpace, Align: size, position etc.
You can preview your image as you type the specifications. Click OK to insert image into the HTML template.
.

.
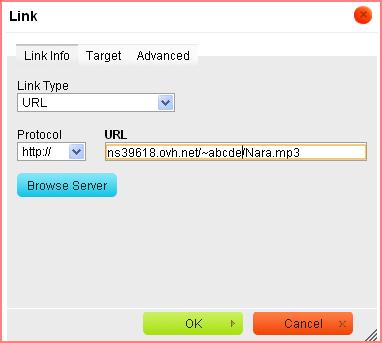
Inserting audio and video clips can be done via the link icon  on the toolbar. Specify the details of the
link as shown below. Further, you can also set the target such that the video/audio clip opens in the same
window or pop-up window etc. You can embed the link in text or an icon image by selecting the text/image and then
clicking the link icon.
on the toolbar. Specify the details of the
link as shown below. Further, you can also set the target such that the video/audio clip opens in the same
window or pop-up window etc. You can embed the link in text or an icon image by selecting the text/image and then
clicking the link icon.
.
.
Another way of adding interesting elements to your test is by directly inserting HTML code into the source of the template.
 - Click the source icon in the
toolbar to view/edit the HTML code.
- Click the source icon in the
toolbar to view/edit the HTML code.
For example, pasting the following code into the source page will add background music to your test page.
<embed autostart="true" hidden="true" loop="false" src="http://cambridgepsychometrics.com/~abcde/Nara.mp3">
</embed>
The following HTML code will embed an audio clip with audio controls on the test page.
<audio controls="controls">
<source src="http://cambridgepsychometrics.com/~abcde/Nara.mp3" type="audio/mpeg">
</source>
</audio>
The src attribute has to be necessarily modified (substitute the url of your audio clip). The other attributes in the code can be modified to suit your needs. autostart indicates whether the song file should start playing automatically or not. hidden indicates whether the media player is hidden or not. loop indicates whether the clip should be repeated.
.
If the items on your test are images, audio clips or video clips, create a table of items that consists of the images/clips.
For example:
If you are not sure of this process, please go through our simple test tutorial.