
This tutorial will help you create a simple test on Concerto v3.6.
You can preview the test here: Concerto v3 Simple Test
Obviously, this is a very basic test, but it easily shows the idea behind Concerto. Don't forget to add formatting of your choice to make the test professional/pretty! The tests that you develop can be run as a separate website or embedded in the other websites and/or applications.
Note: Concerto is case sensitive. For instance, a variable named “item” and “Item” are not considered the same. Therefore, please pay special attention to the letters.
Although Concerto is compatible with all major web browsers, it is best to use Google Chrome to run the Concerto administration panel. Please ensure that you have Concerto v3.0 or higher, preferably the latest version. Go to concerto_installation_path/cms/ and login using your credentials. If you haven't installed Concerto on your server, you can use our demo installation. To create an account or log in to an existing account hosted on our server, go to: http://concerto.e-psychometrics.com/demo/cms/
After logging in to Concerto, switch the interface to the SIMPLE mode using the buttons in the top right corner (you will not need advanced functions as for now!):
The test you create will be composed of three HTML Templates:
Go to the ‘tables’ tab (next to HTML templates).
Note: You can import your tables from CSV files (compatible with R, SPSS, and Excel) and also manage tables using a professional MySQL tool.
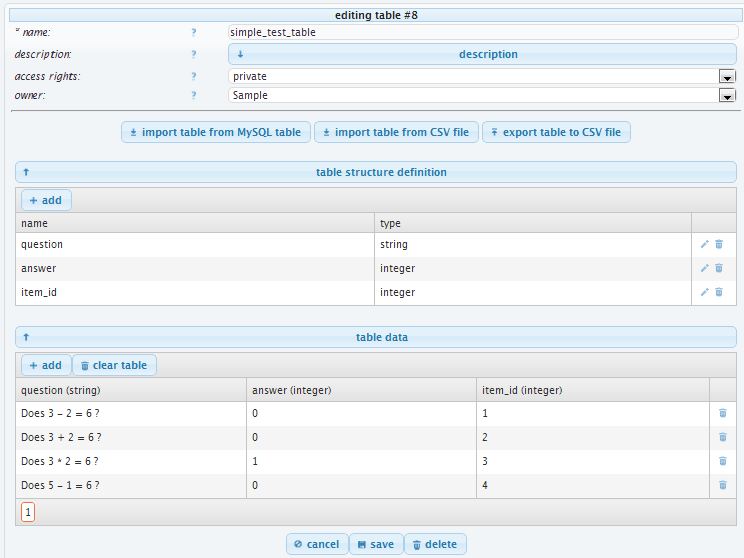
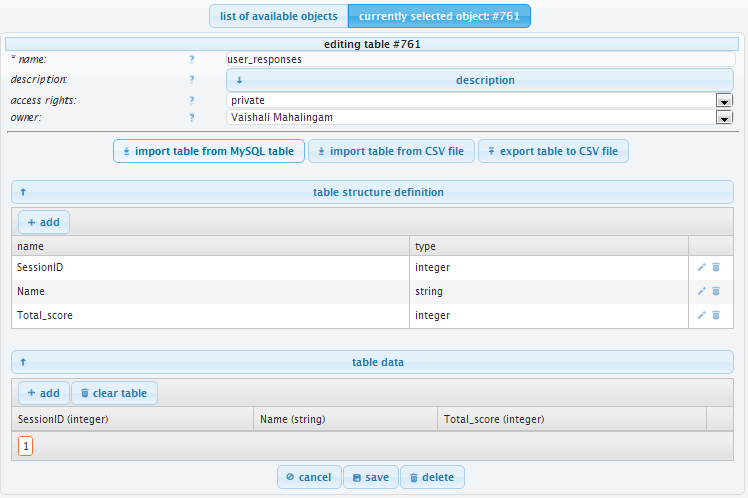
As in the previous step, create a table with three columns to store the data. Go back to the “list of available
objects” under the ‘tables’ tab and click ‘+ add new object’. Assign a name to it (such as ‘user_responses’) and
save it. Add three columns to the table and select the corresponding data types as shown
below:
**SessionID: numeric; to store the test session ID (unique value assigned to each test session,
so that multiple sessions taken by the same participant can be identified from each other.)
At this moment, the table is empty without any rows of data. Don't forget to save the table!
Go to the ‘tests’ tab on the upper left side of the page. Create a new test by clicking the ‘+ add new object’ icon below the “list of available objects” button (it is likely to be empty!). Assign a relevant name for the test and click ‘save’.
To edit a test at any time, click the “list of available objects” button and then click on the pencil symbol towards the right of the specific test you want to edit. Be careful not to click the ‘bin’ icon (second symbol from the left) unless you wish to delete your test!
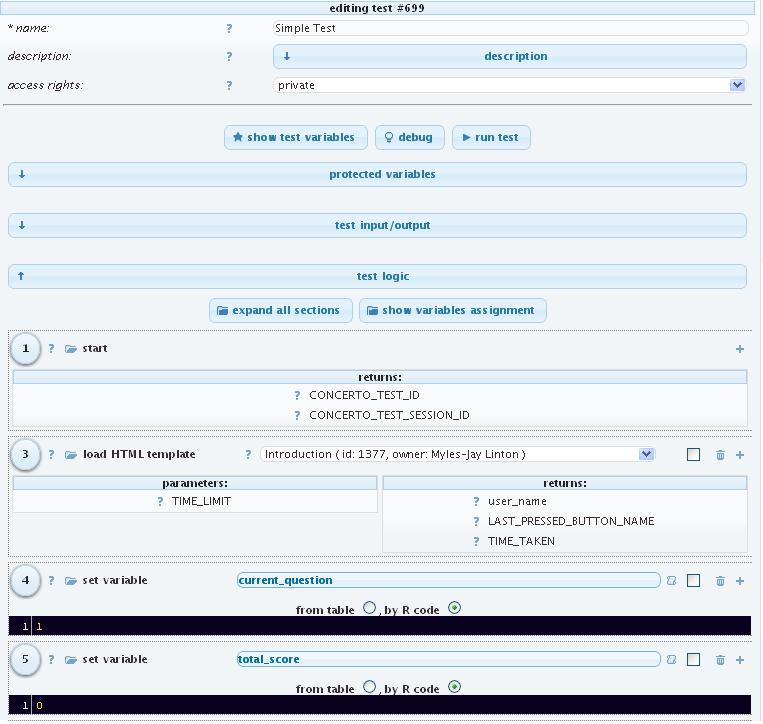
This step involves editing your test overall. To add a new section, click the ‘+’ at the right side of the last section after which you want to insert the new section. Choose an appropriate type for the section and press ‘add’. At this point, the last section is ‘1. start’.
A test always starts from section 1 ‘start’ and ends with section 2 ‘end’. The section number, which is generated automatically based on the order in which the section is added, serves as an index. The test does not necessarily go from section i to section i+1. When you delete a section, its section number will disappear from the test logic, which is not a problem at all. This ensures that adding/deleting test sections in the middle of a test does not change the index of all the other/existing test sections; thus, complicating areas of the test which refer to a specific test section.
The sections can be easily reordered by a simple drag-and-drop function (except for the THEN clause inside an IF statement section). ‘Collapse all sections’ can help you hide detailed information and extract the most information, in order to view the general structure of the test. Conversely, you can press ‘Expand all sections’ to see the whole test in depth.
Follow the table below to add new sections to your test, using the editor. Please double-check your test logic sections using the text and screen shots provided to avoid any errors that may prevent your test from running correctly! Please save your test from time to time to avoid unforeseeable errors. DO NOT press ‘go back’ or ‘refresh’ the page at any time before saving all your work.
| SECTION TYPE | DETAILS |
|---|---|
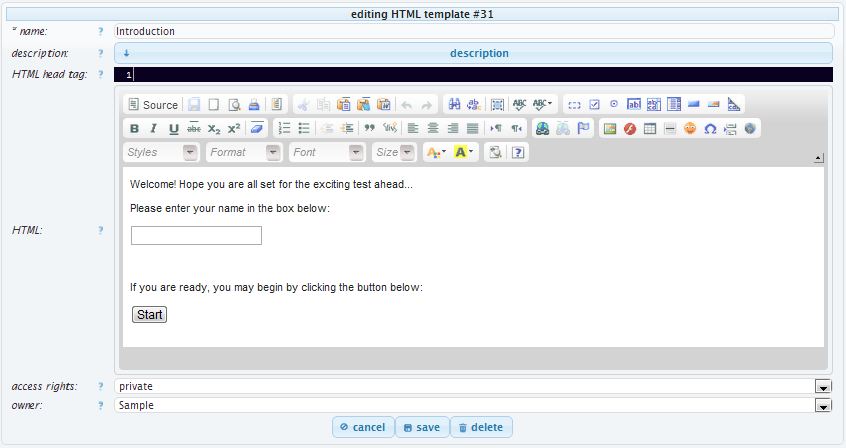
| Load HTML template | Choose the HTML template: introduction (or whatever name you assigned to this HTML template). |
| Set variable | SET VARIABLE: current_question by R code: 1 (We will use this variable to control which question to show next.) |
| Set variable | SET VARIABLE: total_score by R code: 0. (This variable will be used to calculate the total score of the participant by counting the number of correct answers.) |
| - |  |
| SECTION TYPE | DETAILS |
|---|---|
| Set Variable | SET VARIABLE: radio1 by R code: -99 (Add one to the current_question value to select the 2nd question from the table next time, and so on and so forth!) |
| Set variable | SET VARIABLE: question from table: simple_test_table COLUMN: question WHERE: item_id equal current_question (Note what happens - we simply select one cell from the table you’ve created earlier. Concerto will take the content of the cell in the “question” column and the row where item_id equals 1 (you have set current_question to 1, previously)) |
| Set variable | SET VARIABLE: answer from table: simple_test_table COLUMN: answer WHERE: item_id equal current_question. (Now we set variable “answer” to the appropriate value from the table.) |
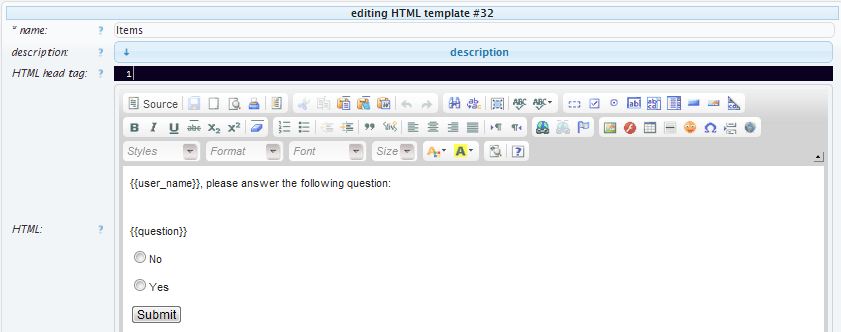
| Load HTML template | Choose HTML template: items (or whatever name you gave to this HTML template). |
| - |  |
| - |  |
| SECTION TYPE | DETAILS |
|---|---|
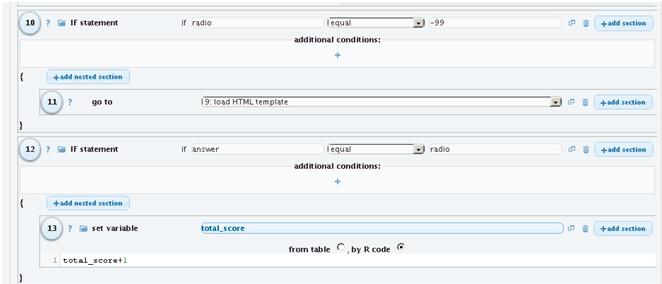
| IF statement | IF radio1 equal -99 THEN click '+' icon below 'THEN'. GO TO SECTION: load items template (i.e. go to the previous section in your test. This step presents the testee with the same item if no radio button is selected.) |
| IF statement | IF answer equal radio1 THEN click '+' icon below 'THEN'. SET VARIABLE: total_score by R code total_score+1 (Simple! IF answer is equal to the value of the radio button selected by the user THEN increase total score by 1. Note: to add the next section “outside of the if clause” use the ‘+’ icon at the very bottom of the entire IF statement box.) |
| - |  |
| SECTION TYPE | DETAILS |
|---|---|
| Set variable | SET VARIABLE: current_question by R code: current_question+1 (Add one to the current_question value to select the 2nd question from the table next time, and so on and so forth!) |
| IF statement | IF current_question equal or lesser than 4 THEN click '+' icon below 'THEN'. Choose section type GO TO: (from the drop-down list select the section of the test where you were setting the value of the “question” variable) (First you check IF you haven’t reached the maximum number of questions you wanted to show. If you haven’t THEN you go back in the test structure –not to the very beginning but to the place where you were getting some values from the table. The section number in the example test here is 6, but it might vary from user to user. Lastly, click the ‘+’ at the top right of the IF statement box to add a new section.) |
| Table Modification | Choose the table you created to store the data (i.e. “user_responses”) and click the radio button next to insert (to add new entries to the table). Click the ‘+’ button under ‘set’ and give values to the columns selected. The values should be variables from the current test, e.g. total_score, user_name, or operations compatible with R language. _Note: CONCERTO_TEST_SESSION_ID is a unique value automatically generated for each test session. Similar variables are CONCERTO_TEST_ID, LAT_PRESSED_BUTTON_NAME, TIME_LIMIT, TIME_TAKEN. You can use these variables without predefining or setting their values._ |
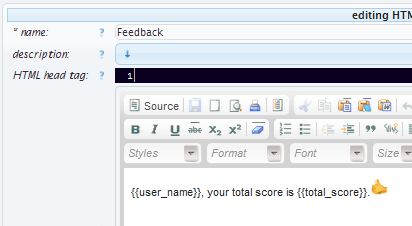
| Load HTML template | Choose the HTML template: feedback (or whatever else you named this template) |
| - |  |
| END |
Note: The section ‘table modification’ comes before the section ‘load HTML template’, because there is no button inserted on the template ‘feedback’ and the test will not move forward beyond this stage. It is also suggested to click the checkbox next to the ‘bin’ symbol in the last section (e.g. section 17 here) before Section 2, end, as it will release all the resources currently occupied when the test reaches this section, so that available resources can be reallocated to other test sessions (lack of resources can be a huge problem if you have a large number of participants taking the test simultaneously).
Click the Run Test button at the start of the tests section.
Alternatively, use the following URL: (concerto_installation_path)/?tid=(TEST_ID)
Or if using a free account on our server: http://concerto.e-psychometrics.com/demo/?tid=69
_Substitute
the last 2 digits in the URL with the_test idof your specific test.
Note: If the test does not work as expected, you will likely see a page with R return code. The second part down the page R output will provide you with the error message which tells you what goes wrong and in which test section.