


.
This document is relevant to Concerto v3.0. If you have a more recent version, please note that not all points noted here will be the same. Nevertheless, a quick run through of the document can still give you an idea of the way Concerto works. If you have an older version installed, it is recommended that you upgrade to the latest version.
Working with Concerto v3 can be easy as A-B-C if you are well oriented with the user interface. This tutorial is a guide to the administration panel and sections (i.e. tabs) that you can use when working with Concerto v3.
We rely as much as possible on popular open source packages in order to maximize the safety and reliability of the system and to ensure that its elements are kept up-to-date.
.
Before we go into the details of the administration panel, you should familiarise yourself with the basic icons present in Concerto v3.0.
| Symbol | Description |
|---|---|
|
Edit object |
|
Delete object |
|
Export object |
|
Import object |
|
Help text; hover over the symbol for a basic description |
|
Cancel changes made to object since last Save |
|
Save changes made to object since last Save |
|
Delete object completely |
|
Debug a test to identify issues/errors |
|
|
Show variables that have been specified in the test |
.

The administration panel consists of several elements and sections.
These elements include:
.
The header of Concerto v3.0 is simple with minimal icons. On the left side:
.
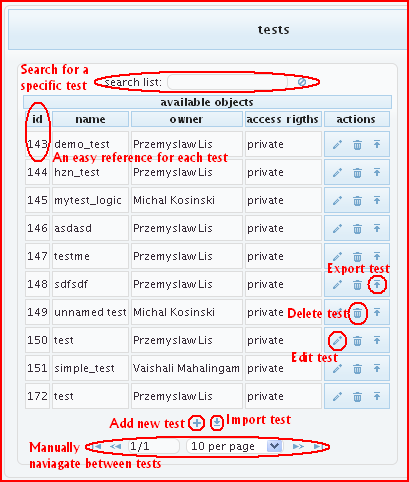
This section is used to create, edit and manage tests as a whole or specific test logic sections.
The left side of the page shows the list of tests that are available to you. Any tests that you create will be visible here. Use this area to create a new test, edit or delete existing tests. You can search for any specific test you want by typing in the test id/name or owner in the search list. You can also manually navigate between tests page-by-page.
When you create a new test or select an existing test to be edited, it will be displayed on the right side of the page, adjacent to the list of available objects. Here you can structure your test using a number of predefined basic test sections, including:
Go to - Select which section to proceed to; can skip sections, go forward, backward, make a
loop etc.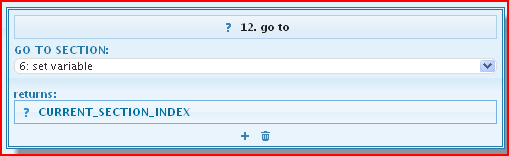
IF statement - make conditional statements regarding how your test should proceed. E.g. If
total score is equal to 10, then proceed to last section. Multiple conditions can be set too.
Load HTML template - Stops the R engine and loads a HTML template as specified.
R code - directly use R code to define variables, run commands etc.
Set variable - Define variables to be used in the test (may be visible in the HTML layer or
only to R) using R code or table data.
Note: To make a variable visible across all
sections, it needs to be declared as a global variable using: var <<- 'value'
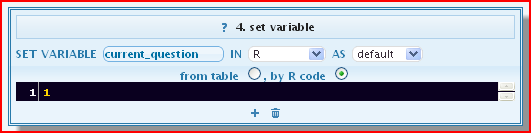
Table modification - Modify existing tables (insert, modify or delete table rows) as your
test proceeds and collects data.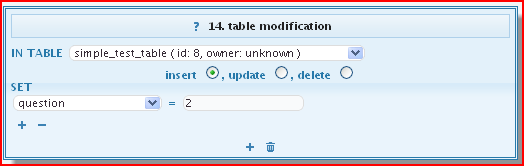
.
This section is used to create custom test logic sections for more experienced users and/or advanced tests. Rather
than having a complicated SQL query/statement that needs to be integrated into the R code, you can develop custom
test sections and save them for easier use and access. If you are confident, they may also be shared and accessible
by others (group or public access rights)!
.
This section is used to create HTML templates that will be presented as is to the test taker. Thus, you can make template as simple or comprehensive as you like.
The left side of the page shows the list of HTML templates that are available to you. Any templates that you create
will be visible here. Use this area to create a new template, edit or delete existing templates. You can search for
any specific template you want by typing in the template id/name or owner in the search list. You can also manually
navigate between items page-by-page.
When you click on the edit icon of a specific HTML template, it opens the template on the right side of the page. You
can then edit the template as you want it to appear to the test taker. The tool bar includes a range of options for
formatting, response options and inserts etc.
.
This section is used to create tables for storing data to be used in a test (E.g. test items and response options) or
data collected as the result of a test (E.g. test taker’s responses). Again, the page is divided into the list of
available objects/tables, on the left side, and the table being edited, on the right side. When creating or editing
tables, you can directly key in the data (e.g. test items) or import tables from MySQL or a CSV file. The table you
create here can also be exported as a CSV file.
.