LESSON 1: simple survey
general description
We will create a simple survey using this tutorial. The survey will contain:
- intro template - an introductory page where we will greet the user, explain the rules of the
survey and ask for a user name
- survey template - a page where we will ask survey questions
- outro template - a page thanking the user for participation in the survey
- data table - a table where all the answers will be stored for future use
What we will learn in this tutorial lesson:
- how to create HTML template
- how to create table
- how to create test
- how to declare in test logic code responsible for showing HTML template to test participant
- how to show dynamic content on HTML template
- how to insert dynamic data to table at run time
STEP 1: create intro template
Go to HTML template tab

Make sure you are on list of available objects section

Click add new object button

Enter intro as the name for your intro template and click save
button

Enter some text on HTML template editor (you can style the text however you want)

Click on a button to add text field for user name

Enter username as the name of the text field and click OK

Click on a button to add a button to submit the template

Enter button name (btn_next) and button text (next)

And that's it! Your intro template is finished. It should look like this:

Save your template by clicking Save button at the bottom right corner of your screen

STEP 2: creating survey template
Create new HTML template, name it survey, add submit
button to it
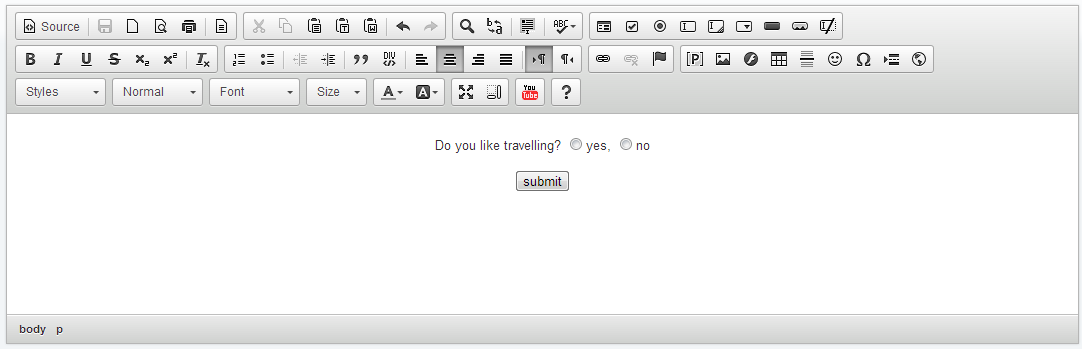
Add a question text above the submit button: Do you like travelling?. The
template should like like this:

Now we will add radio buttons so that user can leave their response. Click the button marked below:

Enter response for the radio button name and enter 1 as a first response
value. When done clicked OK.

Enter yes next to the first radio button response option so that user will know what answer
does this response represent.
Add another radio button next to first one. The name of the both radio buttons should be the same, so set it
to response and set the response value of the seconds radio button to 0. When
done just add the text no next to the second radio button just like before. The template should
look like this:
Save your template by clicking Save button at the bottom right corner of your screen
STEP 3: create outro template
Create new HTML template. Name it outro and add the following text to it's
HTML: Thank you {{username}} for your time!. The template should look like this:

Save your template by clicking Save button at the bottom right corner of your screen
STEP 4: create response data table
Go to tables tab

Make sure you are on list of available objects section
Click add new object button
Enter responses as a new table name and click the Save button

Click add button on table structure definition section to add new table
column

Enter response as the name of the new column and set it's type to
numeric. When done click add.

Your table structure should now look like this:

And that's it. You can now save your table by clicking the save button at the bottom
right corner of your screen

STEP 4: Putting it all together - creating a test
Go to tests tab

Make sure you are on list of available objects section
Click add new object button
Enter survey as the name of the new test and click the save button

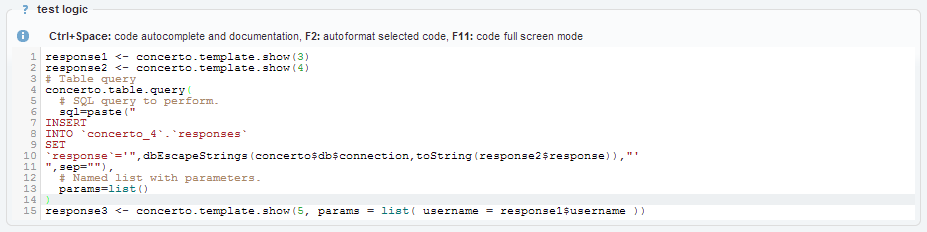
Put the following code in your test logic and place the cursor in the same position as in
the picture:

Line #1: we show intro template (in our example intro template has id: 3, you should change it to the id of your
intro template) and we store user response data in response1 variable.
Line #2: we show survey template (in our example survey template has id: 4, you should change it to the id of your
survey template) and we store user response data in response2 variable.
Line #6: we show outro template (in our example outro template has id: 5, you should change it to the id of your
outro template) and we store user response data in response3 variable. Since on the
outro template we have inserted {{username}} text we can now insert any variable value
there. To do that we need to specify params variable and choose the value for username
param on outro template. In the example above we are using username text field value
from the intro template to fill the {{username}} param on outro template.
Click on function toolbar in bottom left corner of the screen
Now click the insert icon next to concerto.table.query
function. PLEASE REMEMBER THAT THE FUNCTION WIZARD WILL BE INSERTED AT THE CURRENT CURSOR POSITION ON
CODE EDITOR. THE PROPER POSITION TO INSERT THE FUNCTION WIZARD IS SPECIFIED IN PREVIOUS
INSTRUCTIONS.

concerto.table.query function wizard should now be inserted into the code.
Please select the previously created responses table:

Choose INSERT as the query you want to perform on the table

Set the value of column response in new row and set its value to response2$response

Click apply button when it's done

This is how your test logic should look :
Now just save the test by clicking the save button. The test is now ready. You can run it by
pressing run test button.
